
Anatomy of the timesheet (log time card)
1 - time spent during the assignment/work. You can insert hours and minutes. For example, 1 hour 30 min or 50min. Always note whether you are inserting hours or minutes, as the system might not understand if only a number is inserted.
2 - date can be adjusted if needed for the previous or future.
3 - type of the assignment/work done. The types are very important to identify if you want to understand where your employees spend most of their time. Also, to identify to clients what was done from your side when working on the Matter. Type correlates with the hourly rate, so different types of work can have different pricing. How to create types Read Here.
4 - description is the place to specify the type of work that was done. The description is also visible to the clients and can be prepared in advance with the type creation.
5 - owner is the person who is creating the timesheet, but you can assign different people from your company. If the other person is assigned, then the one who is creating the timesheet, there will be an additional mark in the ticket identifying who created it.
6 - relate with the Matter or the Contact. This is very important in order to track what work is done for what clients. You can also assign a task to the timesheet, but in this case, the task has a specific client or matter assigned and links to the timesheet. We suggest enabling the functionality that denies saving the timesheet without assigned Matter or Contact.
7 - billable time that was worked. It means you are charging your clients for the work that you are registering with this timesheet. If this window is unmarked, then the timesheet will register the time as worked time, and the client won't be charged for that.
8 - No charge is also a time that you show the client as billable, but you are not charging for it. It provides an opportunity to show how much specific work should cost a client. These timesheets are inserted into the invoice with zero amount but show the hourly rate. You can enable to count this time as worked and not billable in the invoice (see here).
9 - fixed price allows you to charge a specific amount for the service instead of counting it with the hourly rate. Still, the time should be inserted so you would know how much time was spent while performing this assignment.
10 - extra charge is used only if the contact or matter that is assigned to this timesheet has a budget function enabled. If the contact or matter has a specific budget agreed upon and you want to charge extra (on top of the agreed budget), you should mark this window. It will count billable woke by hourly rate, but you can also mark the fixed price at the same time and insert a specific amount instead of an hourly rate.
11 - billable time is needed to make sure the time registered as spent (1) is the same you want to charge the client. You can distribute the time differently for example, in the (1) table, you can insert that you worked 4 hours and adjust the table (11) with only 2 hours, This will register 2 hours as worked, and you are not charging for them and 2 hours as billable.
12 - currency can be adjusted for the billable price. If the client you are working with has a different currency, we advise setting it in his contact/company card near the settings.
13 - hourly rate is inserted automatically according to the type of work you selected (3) and the position you have in the company. How to set rates Read Here.
14 - total price your client will be charged is counted automatically according to the hourly rate and the billable time.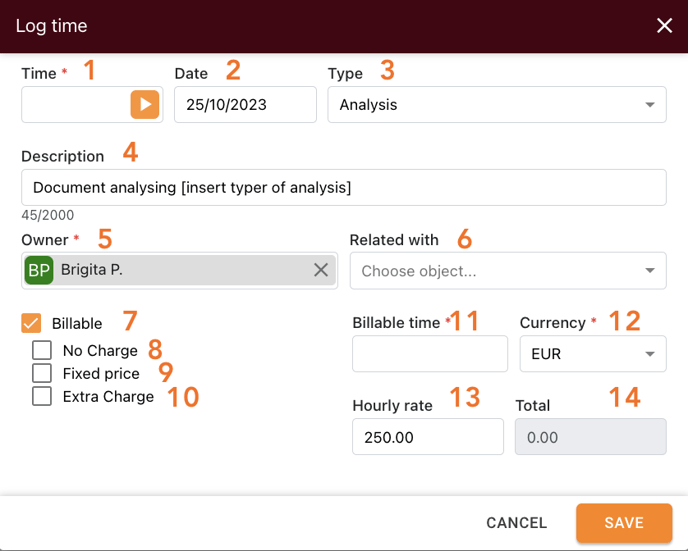
After everything is inserted, press SAVE. The card can be adjusted at any time later if needed.
We hope this will help you to start using it smoothly. If you have any questions or feedback, please feel free to contact us via support@amberlo.io. We are always happy to hear from you!