
How to access Client Portal Settings?
1. Go to the General Settings by clicking on your profile picture in the top right corner.
2. Click Client Portal in the left-hand menu:
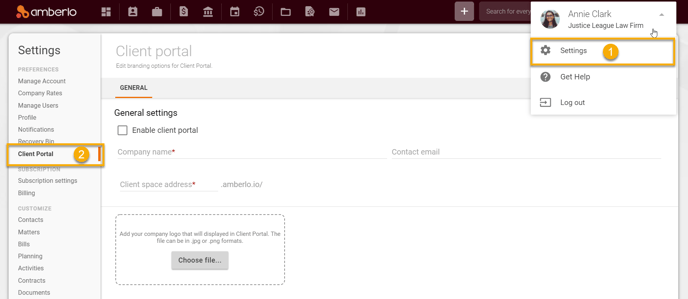
Note: The Client Portal feature is available only for Premium plan subscriptions. Only the Administrator can access and manage Client Portal Settings.
How to set or change General Client Portal Settings?
- Mark the checkbox Enable client portal.
- Enter your company name into the field Company name.
- Enter the Client space address into the field Client space address. Client space address could be your company name or any other name. This field has restrictions: Tenant may contain only letters, numbers, and hyphens, can not begin with a hyphen, and length must be between 2 and 50 characters. Amberlo will generate a link with the client space address you created. Using this link will allow your customers to access and log in to your Client Portal.
- Enter the email address into the field Contact email. This email will be visible on the Client Portal Registration and Login pages.
- Add your company logo that will be visible in the Client Portal. The file can be in .jpg or .png formats. You can leave the Logo field empty. Then Amberlo will display your company name instead of Logo.
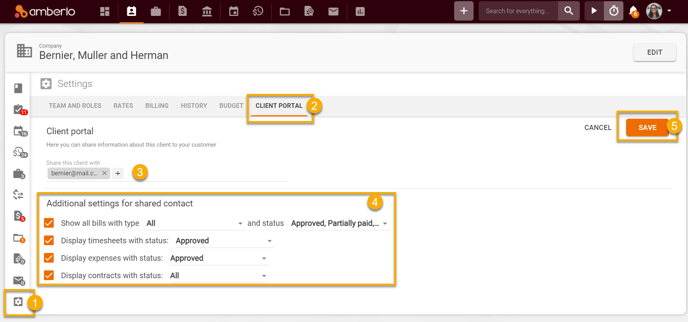
- Click the button SAVE to save your changes:

How to use Client Portal?
Once the Client Portal feature is enabled, you can start to use it. Client Portal feature allows you to share Matter or Contact information with your clients:
- Open the Client or Matter card you want to share and click the Settings button.
- Go to the tab Client Portal.
- Enter emails clients you want to share this Contact or Matter with.
- Choose what information you want to share (e.g., you can choose to share all bills types with statuses Approved, Partially paid, and Paid).
- Click the button SAVE to save your changes:
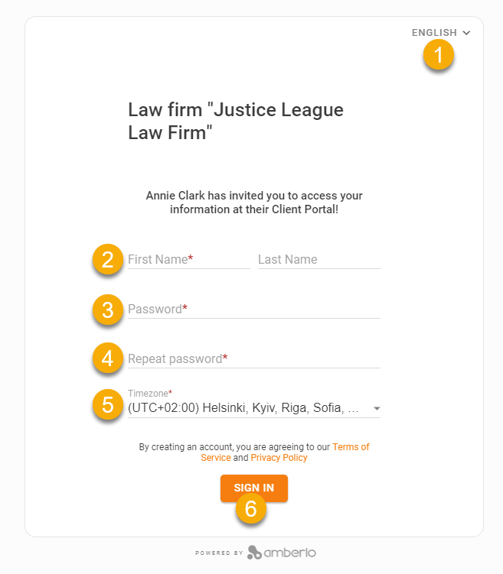
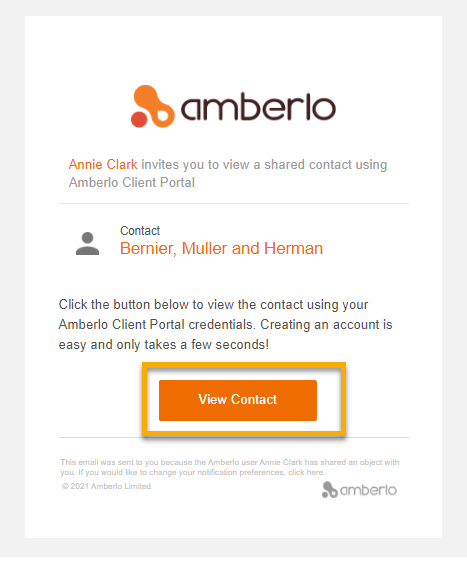
After you click the Save button, your Client will receive an email in his email box that you specified. The client has to click the button View Contact (or View Matter) to start his registration to the Client Portal process:

After the Client clicks the View Contact (or View Matter) button, Amberlo will navigate him to the Client Portal Registration page. The Client must complete the registration form by following these steps
- The client can change the language if needed.
- Enter First name and Last name.
- Enter password.
- Repeat password.
- Change the Timezone.
- Click the button SIGN IN:
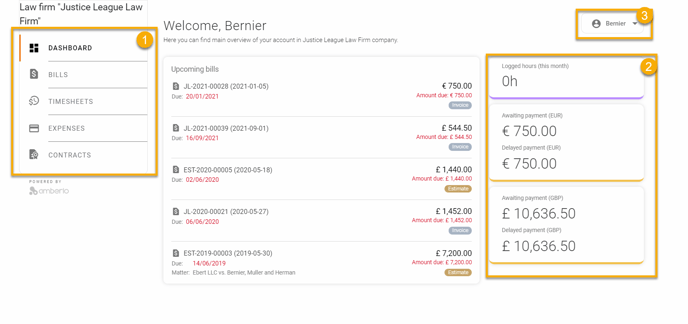
After successful registration client will be logged in to his Client Portal account. In the Client portal account user can access:
- Client Portal menu. Users can access Dashboard, Bills, Timesheets, and Contracts by clicking on the selected menu item.
- Analytics Widgets. The Client can see here logged hours, awaiting and delayed payments.
- Account Settings. The Client can manage his account settings (change password, name, language, etc.) or log out:
After the user logs out from his Client Portal account he can always log in again at any time:
1) by clicking the same button View Contact (or View Matter) in the received email:
2) using the link: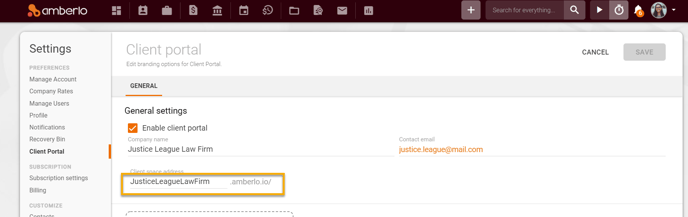
Note: Users can have access to a few Contacts or Matters.
We hope this will help you to start using it smoothly. If you have any questions or feedback, please feel free to contact us via support@amberlo.io. We are always happy to hear from you!