
Reports for the work done are created in the Activity Section
Please navigate to the Activity section. You can usually find this option in the main menu or toolbar, depending on your interface setup. The Activity section is where all time tracking and timesheet data are stored and managed.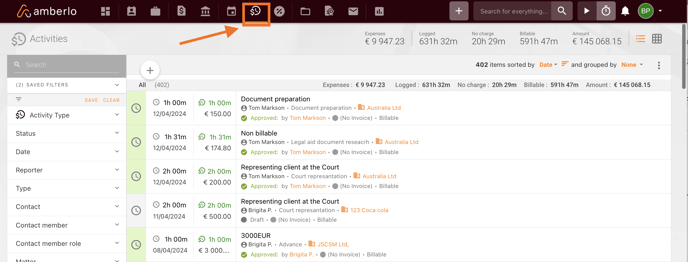
Step 1: Filter the Information
In the Activity section, you have the ability to filter the timesheet data according to specific criteria:
- Clients: Select one or multiple clients to include in your report. This filter is useful when you need to generate reports specific to a client for billing or review.
- Matters: Filter by matters to focus on specific cases or projects. This is particularly helpful for tracking the progress and time spent on individual matters.
- Dates: Choose a date range to include in your report. This can range from a single day to several months or even a year, depending on your need.
- Employees: Filter by employees to see contributions from specific team members or to review their workload and productivity.
To apply these filters, use the dropdown menus and selection options available in the filtering area of the Activity section. Make sure to apply the filters that best suit the report you need to generate.
Step 2: Select All Filtered Files and press Report
After applying the necessary filters, you need to select all the filtered files(1) to include them in your report. Usually, there will be a checkbox (1) or a similar option to “Select All” (3). To find a "Select all" button, you first need to press on the three dots icon (2), and then you will see an additional options table. Ensure that all relevant entries are selected to be included in the report.
With your data selected, look for the “Report” button (4). Click on “Report” to initiate the report generation process based on the timesheets and filters you have set.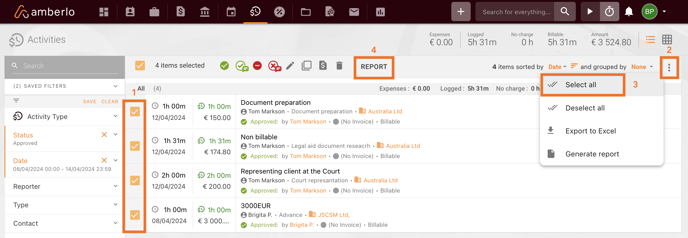
Step 3: Report page setup
Once you press “Report,” Amberlo will generate the report based on your specified criteria. You can select the Report language (1) similarly as you select the invoice language and who generated the report (2) depending on whether you have several company branches. This goes on the report to provide the company's information if you would like to send this report to your clients.
The report can be adjusted according to your needs, you can show or hide specific information by adjusting the Report settings ![]() (3). After everything it's adjusted you can send it straight from the page to your client by pressing the envelope button (4), download a PDF file of the report to your computer (5) or print it (6).
(3). After everything it's adjusted you can send it straight from the page to your client by pressing the envelope button (4), download a PDF file of the report to your computer (5) or print it (6).
*Total worked (7) time and total billable time (8) might be different in your reports, as not all time you registered as worked should be billed. You can also turn off the worked time (7) and not show it in the settings (3).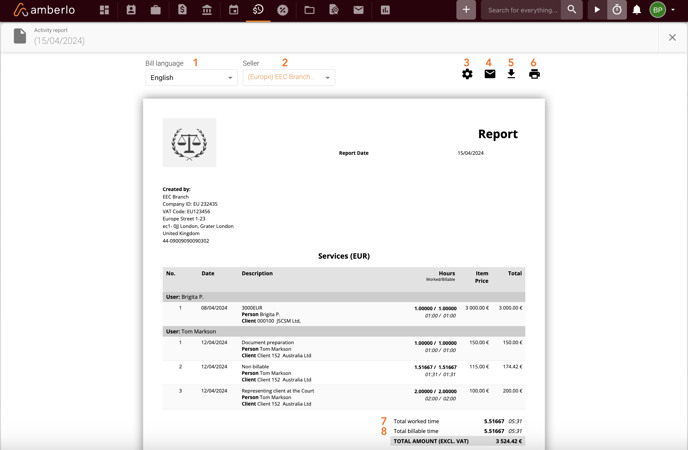
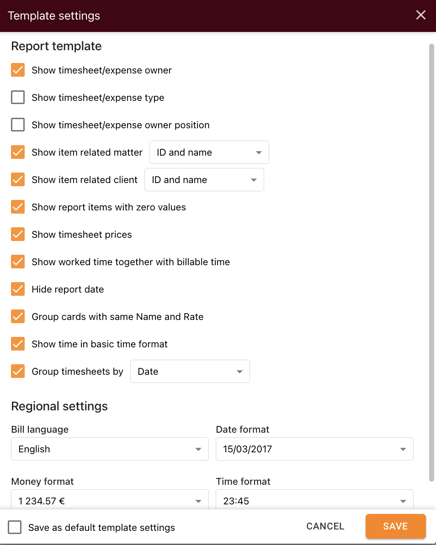
Additional Tips for Report settings customisation
- Group timesheets by preference (date, matter, contact, event or user). This will put the timesheets into smaller groups depending on what you select.
- Show/hide the timesheet information (owner and his position, type, matter name and ID number and etc..).
- Save the template settings to apply the same customisation for the next reports. At the bottom of the Template settings window you have " save as default template settings" checkbox.
By following these steps, you can efficiently create detailed and customized reports from the timesheets in the Activity section of Amberlo, helping you keep better track of time expenditures and improving the management of billing and productivity within your company.
We hope this will help you to start using it smoothly. If you have any questions or feedback, please feel free to contact us via support@amberlo.io. We are always happy to hear from you!